Tutorials
Welcome to the Tutorials section here at Ken's Kustom Konverse Konnection. Here you will find some step-by-step instructions on how to design and create your own custom Converse (or any other shoe, shirt or whatever). The process is pretty much the same regardless of the item youare creating.
Decoupage Tutorial
Decoupage is basically like making a collage. It's used for all sorts of crafts and hobbies and is ridiculously simple. Here's how:
Materials Needed
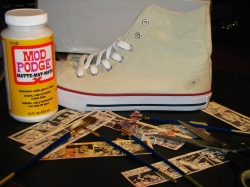
Waterproof Glue (I use Mod Podge - Matte finish)
Scissors
Pictures (from comic books, magazines or printed on your computer, etc.)
Medium paint brush
The item to be decoupaged (in this case, a shoe)
Soapy water
Scissors
Pictures (from comic books, magazines or printed on your computer, etc.)
Medium paint brush
The item to be decoupaged (in this case, a shoe)
Soapy water
Step 1
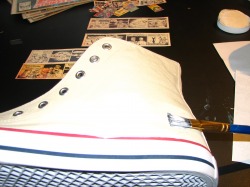
First thing you will want to do is find pictures that you want to use for your decoupage shoe and cut them out. I find that newsprint works well, old comic books, etc. Magazines are OK but they are glossy and therefore not very absorbant. For these shoes I used images I printed on my computer. This worked well, but the glue will pull some of the ink out of the printed image. Not much, but you will see the blue and red ink come out a little. It didn't make a difference on the final product though, so I think it's pretty safe.
Next, take a brush (use the middle-of-the road kind - not cheap but not expensive) and brush a thin coat of glue onto the shoe and another thin coat onto the back of the picture you want to apply and gently place the image onto the shoe. The Mod Podge will go on milky white but don't worry, it dries clear.
NOTE: Make sure to wash out the brush periodically with soapy water. Wash the brush with soapy water before the glue can dry in the bristles.
Step 2

Once the picture is in place, lightly brush a thin layer of glue on top of the application.
Continue Steps 1 and 2 until the shoe is covered to your satisfaction.
Once you have satisfactorily covered the shoe, apply a final thin coat to seal all seams, etc. Again, be careful not to put too much glue on or else the canvas will become too stiff.
Continue Steps 1 and 2 until the shoe is covered to your satisfaction.
Once you have satisfactorily covered the shoe, apply a final thin coat to seal all seams, etc. Again, be careful not to put too much glue on or else the canvas will become too stiff.
Complete side
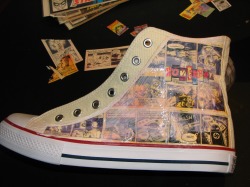
This is one complete side. Notice how it's sort of murky looking. In the next photo you will see that it has dried clear.
Repeat Steps 1 and 2 on the other side of the shoe.
Repeat Steps 1 and 2 on the other side of the shoe.
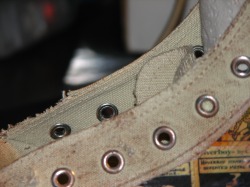
Step 3 (optional)
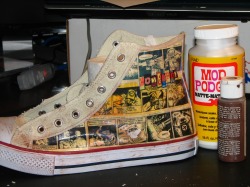
In this project I was trying to make this look like a shoe that has been well worn. I took an Xacto knife and scored the edges of the shoe. While the glue was still a little tacky I accidentally pressed the side of the shoe onto the table and it pulled away a spot on the paper. I thought it looked kinda cool and worn out so I left it rather than try to fix it. Sometimes we stumble across these techniques by happy accident.
Title.
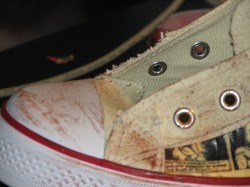
I also dry brushed a little brown craft paint and rolled the shoe around in the dirt for a little more wear and tear effect. After that I took a seam splitter and cut a few stitches, scuffed the edges to finalize the well worn look.
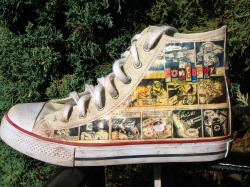
Final Shoe
The outside panel - complete
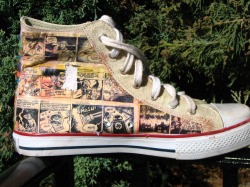
The inside panel - complete
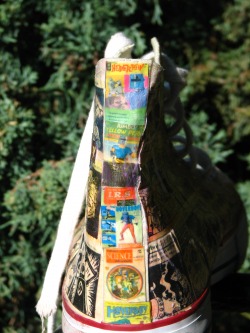
The ankle strip - complete.
And there ya have it. One complete decoupage shoe. In this case I'm only making one shoe for the official Hoverboy website (hopefully).
Check out Hoverboy at www.hoverboy.com. It's fun.
Hoverboy . . . AWAYYYYYYYY!!!!!!!!!!!!!!!!!
And there ya have it. One complete decoupage shoe. In this case I'm only making one shoe for the official Hoverboy website (hopefully).
Check out Hoverboy at www.hoverboy.com. It's fun.
Hoverboy . . . AWAYYYYYYYY!!!!!!!!!!!!!!!!!
